set-dem-source Command
Specifies which DEM (digital elevation model) source Maperitive should use for various DEM-related operations. You can specify built-in sources (like SRTM1 and SRTM3) or your custom source.
Usage
 set-dem-source
     name=<DEM source name>
Parameters:
- name: specifies the name of the DEM source. See the subsections below for instructions on setting built-in and custom DEM sources.
Using Built-In DEM Sources
Built-in DEM sources are easier to use because Maperitive automatically downloads the DEM data from the required web server. Currently there are three DEM sources built into Maperitive:
- SRTM3: this is the default DEM source when you start Maperitive for the first time. It covers most of the world from 56°S to 60°N of latitude. The resolution is three arcseconds (cca. 90 m). It contains a lot of data voids, especially in mountainous areas like Alps (see data voids for more information). This data voids cause generated relief images and contours to contain "white spots". The data is in Public Domain.
- SRTM1: similar to SRTM3, but with one arcsecond (30 m) resolution and covering only USA territory.
- SRTMV3R3: a NASA's new version (v3.0) of SRTM3, which has the data voids filled. To be able to use this source, you need to follow Access to SRTM V3 instructions below. Covers most of the world.
- SRTMV3R1: a NASA's new version (v3.0) of SRTM1, which has the data voids filled. To be able to use this source, you need to follow Access to SRTM V3 instructions below. Covers most of the world.
- VF.Alps: one arcsecond resolution DEM covering Alps without any major data voids. Source: http://www.viewfinderpanoramas.org/dem3.html#alps.
Access to SRTM V3
NASA's SRTM V3 is generally the best DEM source that you can get. It does not have data voids and its R1 (1 arc second) variant is now available for most of the world. The only drawback is that the data can only be accessed through NASA's EarthData portal login (and not anonymously like it is possible for the old V2 data).
Technical Details
EarthData uses OAuth 2 protocol, but NASA does not seem to allow external applications (like Maperitive) to register and receive user authentication tokens. The only way I could find to allow Maperitive to access their DEM data was to insert OAuth authentication token directly into HTTP requests. Each user that wants to use SRTM V3 data will need to register on EarthData portal and then perform the (somewhat hacky) procedure described in following subsections.
The Procedure
The procedure assumes you are using Chrome as your browser and it describes instructions on how to inspect the HTTP request using Chrome's Developer Tools. Most (all?) other browsers also allow HTTP request inspection, either through built-in tools or using a browser extension. Google is your friend here.
Delete Existing SRTMV3R1/SRTMV3R3 Cache Index
In order for this procedure to work correctly, you may need to delete any existing tile index files stored in the cache, if they were created by Maperitive prior to version 2.4.0. The two files to delete are Cache/Rasters/SRTMV3R1/TileIndex.dat and Cache/Rasters/SRTMV3R3/TileIndex.dat under the Maperitive installation directory.
Registering on EarthData Portal
The first thing you need to do is to register yourself on the EarthData portal, if you haven't done that already. You will also have to allow NASA's applications access to your newly registered account (read the instructions on the portal).
Access A Sample SRTM File
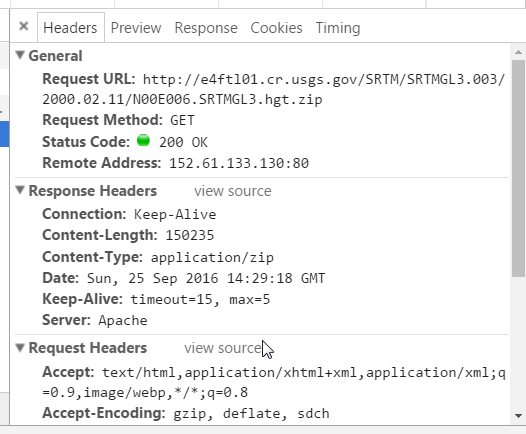
After registering on the EarthData portal, visit the SRTM V3 server by entering https://e4ftl01.cr.usgs.gov/MEASURES/SRTMGL3.003/2000.02.11/ URL in the browser. Be patient while it loads the directory list, the file list is huge and the server is slow.
Now open Chrome's Developer Tools (F12 keyboard shortcut) and click on its Network tab. After that, click on one of the .hgt.zip files in the directory list (like https://e4ftl01.cr.usgs.gov/MEASURES/SRTMGL3.003/2000.02.11/N00E006.SRTMGL3.hgt.zip) to download it. The browser will ask you for EarthData login credentials and after the successful login, the network tab should contain an entry that looks something like the one below (be sure to use the one with status 200, not 302!):

Now click on that entry and the details pane will show up:
Scroll down to Request Headers section and look for Cookie entry starting with 'DATA=':
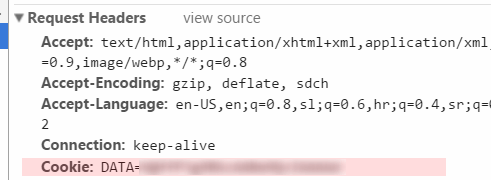
What comes after that '=' character is a string called authentication token and we need to supply it to Maperitive for it to be able to download SRTM tiles on your behalf. So copy the token into the clipboard (or a text editor) and continue to the final step.
Give Maperitive the Authentication Token
Run Maperitive and enter the following command in the Command Prompt:
set-setting name=user.earthdata-auth-token value=<auth token>
(replace <auth token> with your own authentication token copied in the clipboard, without <> brackets).
That is it. Now you should be able to access the SRTM V3 tiles within Maperitive - try it out using one of Maperitive's relief functions. And also be sure to read the following Troubleshooting section.
Troubleshooting SRTM V3 Access
You may encounter several errors when trying to download SRTM V3 tiles:
- "OAuth 2 authentication token for NASA's server is not provided, unable to access the SRTM data" - this means you have not provided the authentication token.
- "The remote server returned an error: (401) Unauthorized" - the authentication token you provided is no longer valid. This either means you have switched your computer to another network or that the token is too old.
- "There is no 'SRTMV3R1' DEM coverage for the requested area" - you probably did not delete the existing tile index files.
In all of the above cases, repeat the procedure described above.
Using Your Own Custom DEM Sources
TODO
Links & Resources
- Shuttle Radar Topography Mission - NASA's official site
- Wikipedia: Shuttle Radar Topography Mission
- Viewfinder Panoramas - Unofficial SRTM data with voids corrected using topographic maps
- vterrain.org: SRTM: NASA Shuttle Radar Topography Mission
- SRTM3 Coverage Map
- SRTM1 Coverage Map
- igorbrejc.net: Viewfinder DEM Data: Comparison With SRTM